This guide provides the steps necessary to connect and use WooCommerce on Oviond, including permissions, limitations, and troubleshooting.
Ensure you have an Oviond account with administrative access.
You must have Admin or Super Admin access to the WordPress account associated with WooCommerce.
Your permissions on WordPress will determine the access you have to connect and retrieve data from WooCommerce. Therefore, you will first need login credentials to the WordPress account in order to get the Shop URL, Consumer key, and Secret key for WooCommerce to connect it as an integration on Oviond. You need a role as an Admin or Super Admin to get this data.
When creating the API key, make sure the Permissions are set to Read/Write. Here are a few steps on how to do this when using the WooCommerce plugin on WordPress:
Login to your WordPress account.
Select the tab named WooCommerce in the navigation bar on the left.
Click 'Settings'.
Click 'Advanced'.
Click 'REST API'.
Click 'Add key'.
Fill in the Description field, choose a user and select Read/Write Permissions.
Click 'Generate API key'.
Note: Make sure to copy your new keys now as the secret key will be hidden once you leave this page.
Open Oviond and navigate to the client you wish to connect WooCommerce to.
Select Project or Start a New Project
Select the project you want to work on or start a new project.
If starting a new project, it will automatically open in the Workspace Editor.
Access the Project Workspace Editor
Click 'Edit' to access the Project Workspace Editor if you are working on an existing project.
In the action sidebar menu on the right, select Data Sources.
Select WooCommerce.
Fill in the Shop URL, Consumer key, and Secret key.
Click 'Save'.
Choose Default WooCommerce Account and click 'Save'. The first authenticated account will automatically be called "Default WooCommerce Account") and you can change this in Data Sources.
If using WooCommerce as a plugin through WordPress, you need to ensure that the WordPress REST API is enabled.
To use the latest version of the REST API you must be using:
WooCommerce 3.5+.
WordPress 4.4+.
Pretty permalinks in Settings > Permalinks so that the custom endpoints are supported. Default permalinks will not work.
You may access the API over either HTTP or HTTPS, but HTTPS is recommended where possible.
If you use ModSecurity and see 501 Method Not Implemented errors, see this issue for details.
If you get this error message on your report:
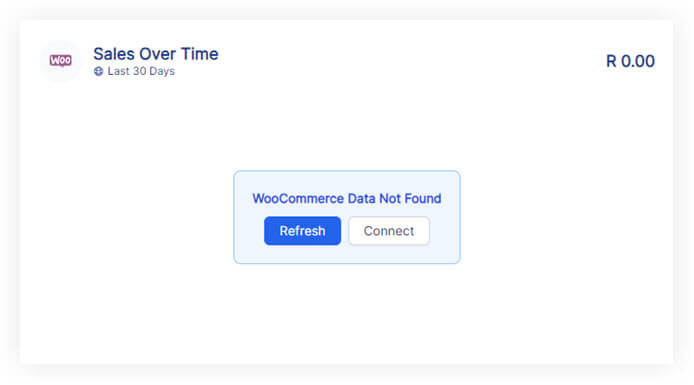
Please follow these steps:
Click on the refresh button in the widget or next to the date selector in the project.
if the widgets still don't load data
Click on 'Connect' in the widget and make sure you have connected the correct WooCommerce account.
if the widgets still don't load data
Go back to Data Sources for the client and click 'Add New' to create a new authentication for WooCommerce. Make sure you are getting the Shop URL, Consumer key, and Secret key correct.
If you have followed these steps and are still experiencing issues with WooCommerce on Oviond, please contact support.
Following these steps will help you successfully connect WooCommerce to Oviond, enabling seamless data integration for your dashboards and reports.
How to connect a data source from a widget
Learn how to connect a data source from a widget in Oviond with this step-by-step guide for seamless data integration.
